5 Essential Whitewater Rafting Skills Every Paddler Must Master

Reading the River and Identifying Rapids
Mastering Essential Paddle Strokes
Team Communication and Commands
Swift Water Swimming Techniques
Basic Rescue and Recovery Skills
What Are the Most Important Whitewater Rafting Skills for Beginners?
Mastering whitewater rafting demands more than just enthusiasm. This guide breaks down five core competencies—reading water, paddling technique, swimming skills, communication, and safety procedures—that separate confident paddlers from liabilities on the river. Whether you're booking your first guided trip on the Upper Youghiogheny or preparing for a multi-day expedition, these skills form the foundation of every successful run.
Here's the thing: most rafting accidents stem from gaps in fundamentals, not extreme conditions. A solid grasp of these basics keeps you safe—and makes the experience exponentially more enjoyable.
How Do You Read River Currents and Hazards?
River reading is the ability to interpret water movement, identify hazards, and choose safe routes through rapids. It's the single most valuable skill a paddler can develop.
Water behaves predictably once you understand the physics. Current flows downstream fastest where the channel is deepest—typically the outside bends of rivers. Rocks and obstructions create distinct features: eddies (calm water behind obstacles), hydraulics (recirculating water that can trap swimmers), and waves (formed when current hits submerged objects).
Start by studying the river from shore. Look for V-shaped tongues of smooth water pointing downstream—these indicate the deepest, safest channels. Avoid the downstream side of large rocks where recirculating hydraulics form. The American Whitewater Association maintains excellent river classification systems and hazard reports for rivers across North America.
Worth noting: guides spend years refining this skill. On your first trips, ask questions. Have your guide point out features like "haystacks" (standing waves) and "holes" (hydraulics). Watch how experienced paddlers read the water ahead of the raft—scanning continuously, identifying the line, and adjusting as conditions change.
Key River Features to Recognize
| Feature | Appearance | Risk Level | Strategy |
|---|---|---|---|
| Eddy | Calm water behind rocks/obstacles | Low | Use for rest, scouting, or regrouping |
| Hydraulic (Hole) | Foamy, recirculating water | High | Avoid or punch through with momentum |
| Standing Wave | Stationary wave facing upstream | Medium | Hit straight on, keep paddling |
| Strainer | Brush, trees, or debris in current | Extreme | Avoid entirely—swim away if nearby |
| Chute | Narrow channel between obstacles | Variable | Line up early, maintain speed |
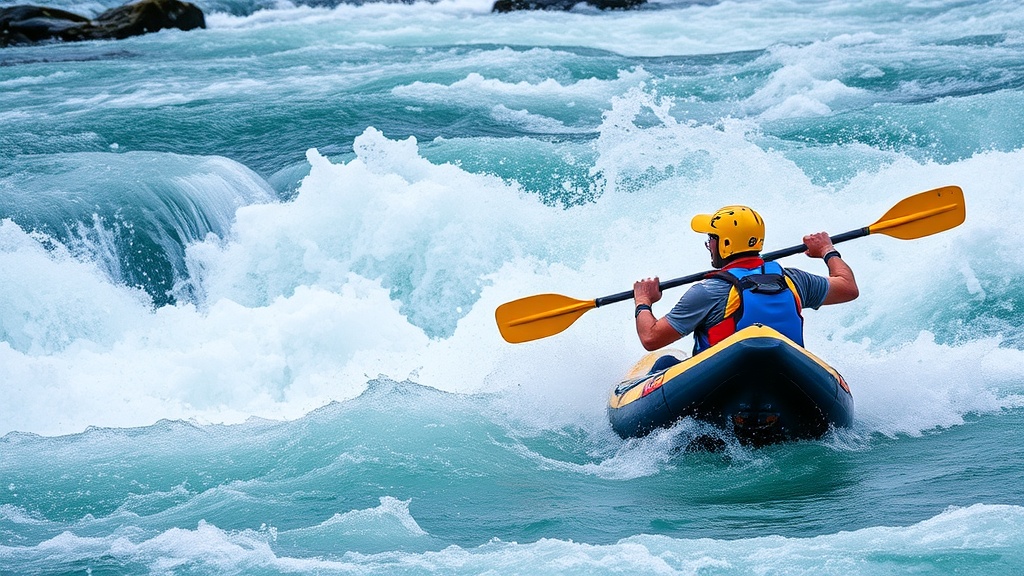
What Paddling Techniques Work Best in Rapids?
Proper paddling technique maximizes power efficiency, prevents injury, and keeps the raft on line through technical sections. Most beginners grip too tightly and use their arms instead of their core.
The forward stroke is your bread and butter. Plant the blade fully in the water near your toes, rotate your torso (not just your arms), and pull the paddle alongside the raft. Exit the water at your hip—dragging behind wastes energy. The power comes from your core and legs, not biceps.
The draw stroke moves the raft sideways. Reach out perpendicular to the boat, plant the blade, and pull water toward you. This positions the raft precisely—critical for hitting narrow chutes or avoiding rocks.
Back paddling reverses momentum. It's not just for emergencies; guides use it constantly to slow the raft, hold position in an eddy, or adjust the angle before entering a rapid.
That said, timing matters more than brute force. When a guide calls "All forward!"—every paddle hits the water simultaneously. Synchronized paddling generates far more power than individual effort. Practice the cadence on flat water before testing it in Class III rapids.
Equipment matters here. The Werner Powerhouse and Aqua-Bound Manta Ray are popular paddle choices among serious rafters—lightweight, durable, and properly sized for different paddler heights. A paddle that's too long strains your shoulders; too short limits your reach.
How Should You Swim if You Fall Out of a Raft?
Swimming in whitewater is inevitable—even experienced rafters swim occasionally. Knowing how to position your body and move through current can mean the difference between a quick recovery and a dangerous situation.
The defensive swimming position is your default. Float on your back with feet pointing downstream, knees slightly bent, and head up. This protects your head from underwater rocks and keeps your airway clear. Never stand up in moving current—foot entrapment (when a foot wedges between rocks) is one of the most dangerous scenarios in rafting.
Use your arms to steer toward safety. Backstroke toward eddies or the riverbank. If you need to catch a rope from the raft or shore, flip to your stomach and aggressively swim toward it.
The catch? Swimming in rapids is exhausting. Current works against you constantly. Conserve energy by floating when possible and only swimming aggressively when targeting a specific safety zone. If you see a strainer (branches or debris in the water), swim hard to avoid it—this is one situation where maximum effort is non-negotiable.
Always wear a PFD (personal flotation device) rated for whitewater. The Astral GreenJacket and Stohlquist Rocker are trusted options with sufficient buoyancy for challenging swims. Your helmet protects against rocks, paddles, and the raft itself—never skip it, even on "easy" sections.
Why Is Communication Critical on the River?
Rafting is a team sport where split-second coordination matters. Hand signals and voice commands bridge the gap when engine noise, wind, or rapids drown out conversation.
Standard commands include: "All forward" (paddle forward together), "All back" (back paddle), "Left back, right forward" (spin the raft right), and "Hold" (stop paddling). Guides also use "Get down!"—the command to immediately sit in the center of the raft and hold the safety line, typically when hitting a large feature or during a potential flip.
Hand signals work when voice fails. A raised fist means stop. Pointing indicates direction. Thumbs up and down confirm readiness. Every commercial outfitter briefs guests on their specific command set—pay attention during the safety talk.
Worth noting: communication flows both ways. If you're struggling, say something. If you see a hazard the guide missed (it happens), speak up. Good guides welcome input and adjust plans based on team capability and comfort level.
On multi-day trips or private boating expeditions, whistle signals add another layer. Three blasts typically indicate an emergency. One blast might signal "attention." Know the system before you launch.
What Safety Equipment and Self-Rescue Skills Do Rafters Need?
Self-rescue capability transforms passengers into valuable team members. The foundation starts with understanding your equipment and knowing how to reboard a raft.
Throw bags are the primary rescue tool. These bags contain 50-75 feet of floating rope and are used to pull swimmers to safety. If you're on shore and someone swims past, hold the bag end, throw the coil upstream of the swimmer (so current carries it to them), and brace for the pull. Never wrap the rope around your hand—swimmers in current generate surprising force.
Reboarding a raft requires technique. Swim to the side, grab the perimeter line or a helper's hand, and kick vigorously while pulling. Guides may offer a "T-grip"—grab their paddle shaft and let them leverage you in. If you're helping someone board, stabilize their weight to prevent capsizing the raft.
Flip drills prepare teams for the worst-case scenario. If the raft overturns, work together to regain the boat, collect paddles, and account for everyone. Stay calm—panicked swimmers burn energy and make poor decisions.
That said, prevention beats rescue every time. Scout rapids when uncertainty exists. Portage (carry the raft around) dangerous sections rather than risking disaster. The REI Expert Advice section offers detailed guidance on trip planning and risk assessment.
Pack appropriate gear for the river and season. Wetsuits or drysuits protect in cold water—hypothermia sets in quickly even on warm days if the water is snowmelt-fed. The NRS Expedition Drysuit is a serious investment for regular paddlers, while simpler wetsuits suffice for occasional summer trips.
"The best rescue is the one you never need to perform. Preparation, communication, and conservative decision-making keep incidents rare and minor." — Safety protocols from American Whitewater Safety Guidelines
These five skills—reading water, paddling technique, swimming competence, communication, and safety awareness—build upon each other. Start with professional instruction, practice on progressively challenging rivers, and never stop learning. The river always has something new to teach.